こんばんは、UNIKO's hardware です!!
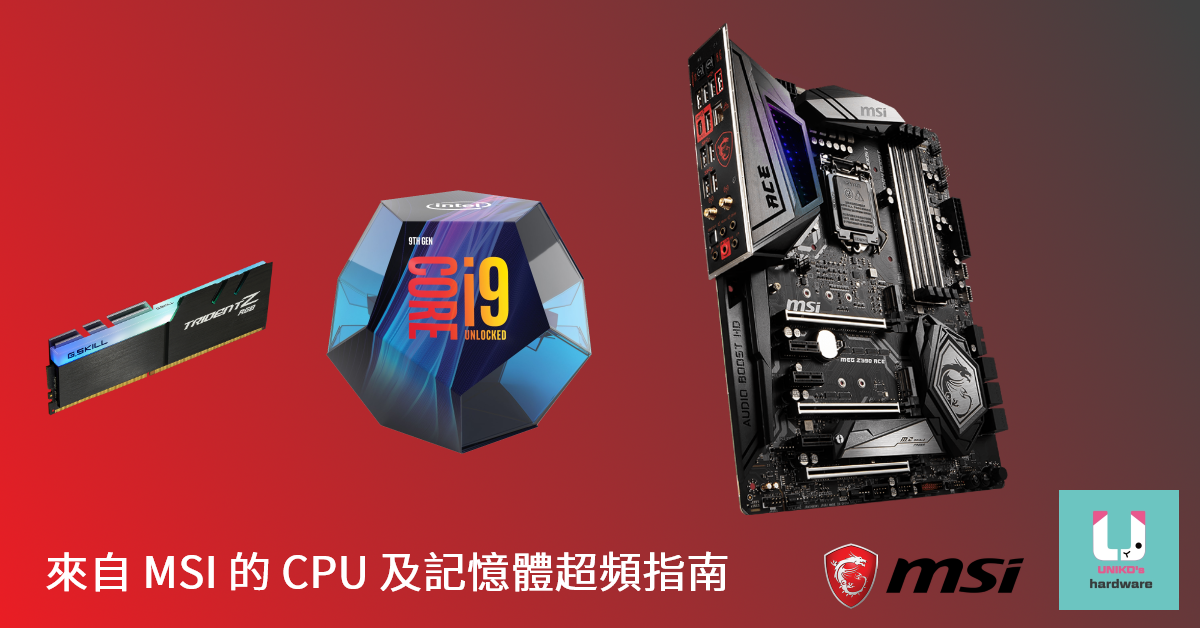
MSI 針對喜歡超頻的玩家製作了一份超頻教學,內容包含使用 Z390主機板搭配 Intel 9 代 CPU 與記憶體超頻,圖文逐步教學,UH 也有幫大家將重點整理出來歐~
CPU 處理器推出時,官方會對每個 CPU 型號制定規格,其中一項為基礎頻率,因此透過手動方式調整 CPU 頻率讓其超過官方預設值,即為所謂的超頻。現今 Intel CPU turbo Boost 渦輪加速技術,可稱為官方自動超頻,根據 CPU Loading 不同改變處理器頻率,讓功耗與效能獲得一個平衡,而現在我們要說明的超頻方式將會突破這個限制,讓 CPU 效能更好,亦是超頻的目的,當然超頻是有風險的,這點使用者需要注意。
免責聲明:超頻風險自負!
超頻若操作不當將有可能損壞零組件。
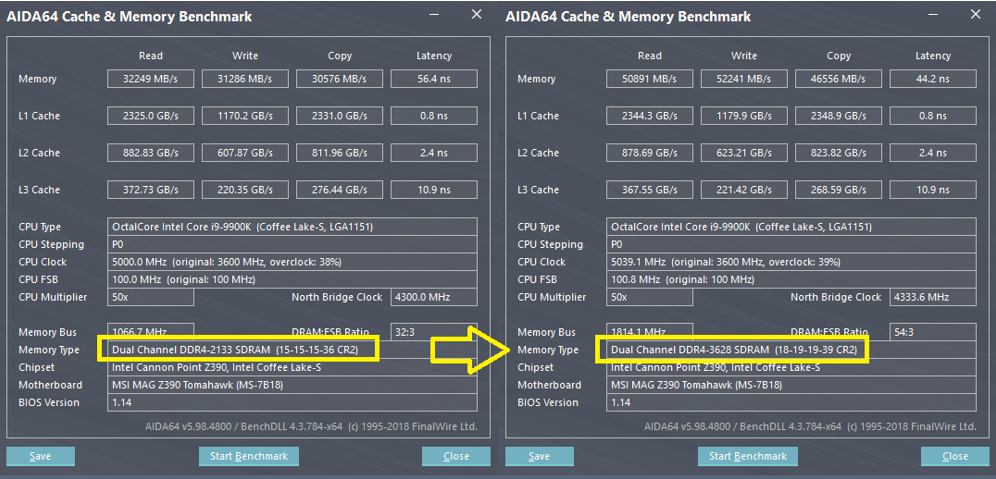
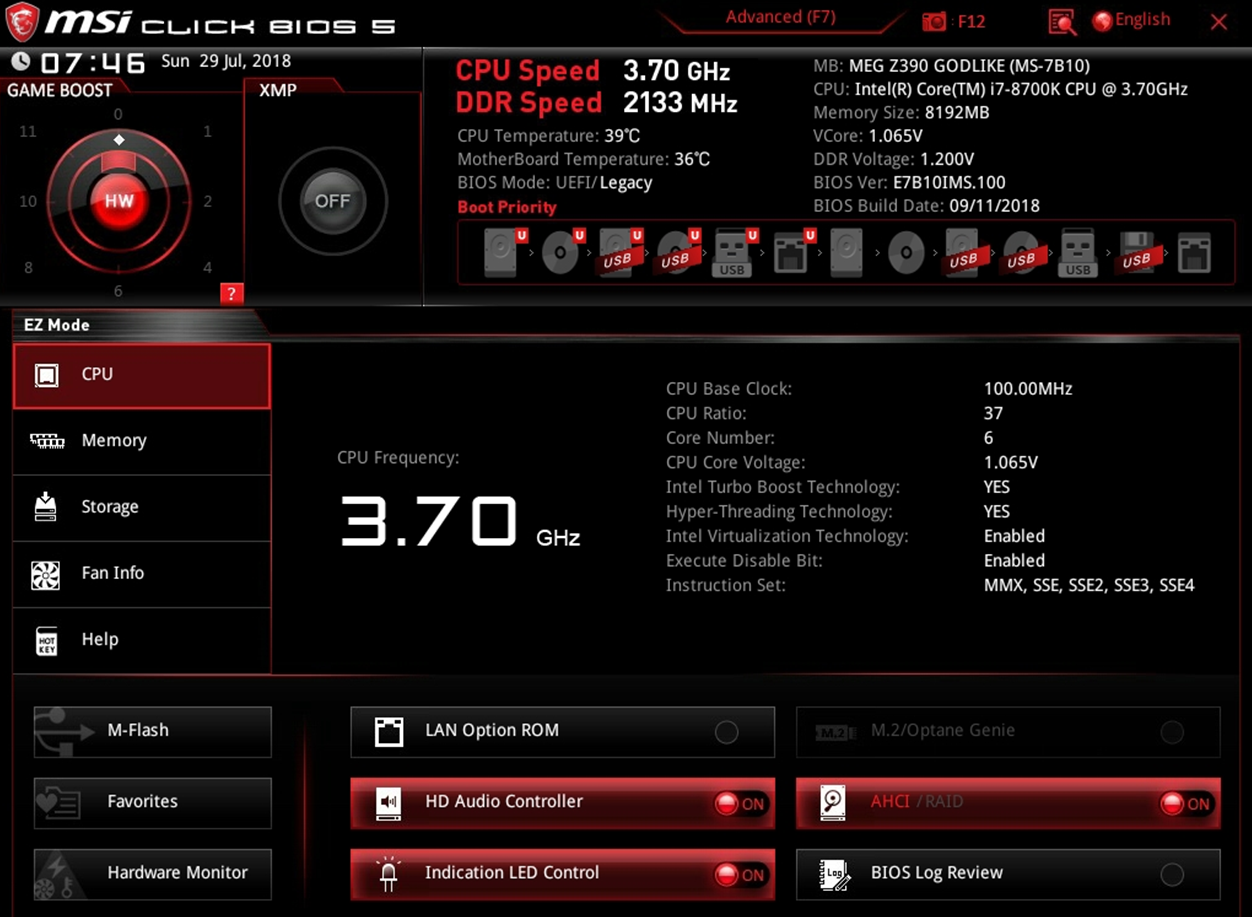
BIOS 版本為 E7B10IMS.100,記憶體為 DDR4-2133MHz X2 跑雙通道,散熱器為 DIY 水冷。BIOS 版本不同數據與功能會有差異,且設備差異將有可能影響散熱與效能,玩家們需要注意。
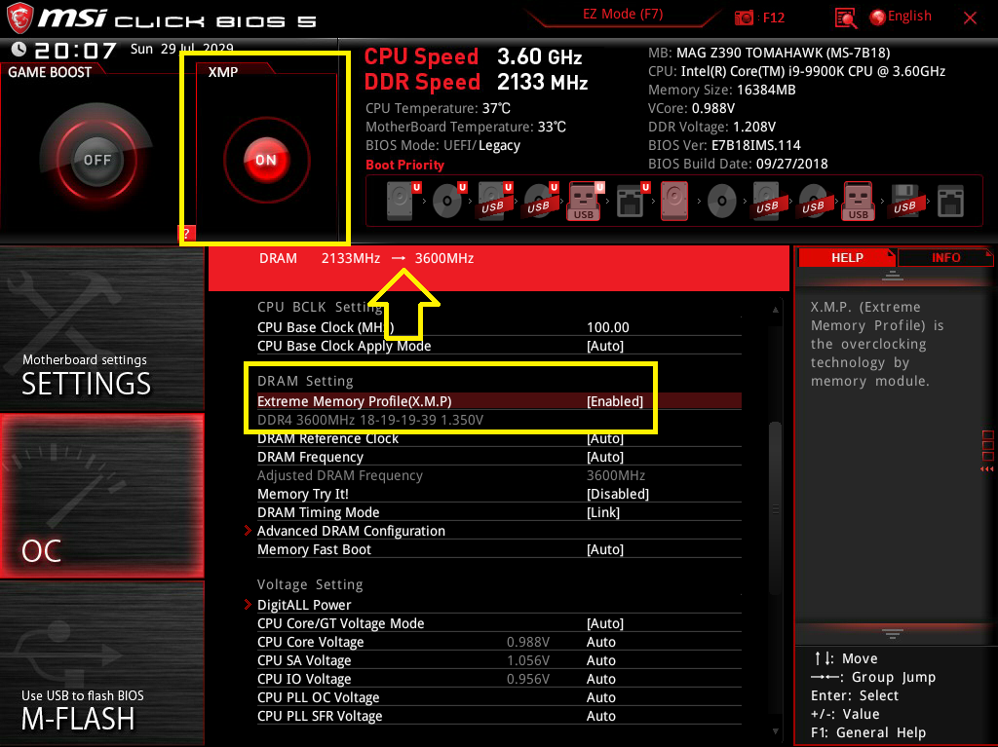
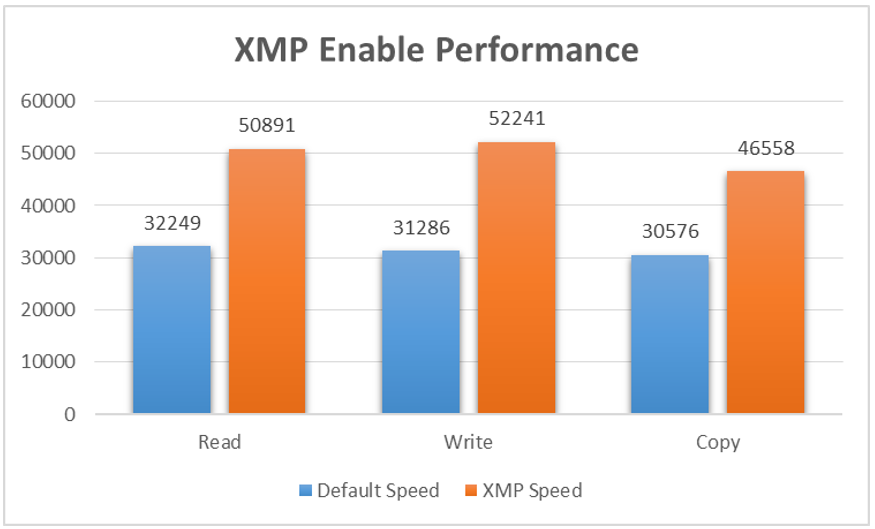
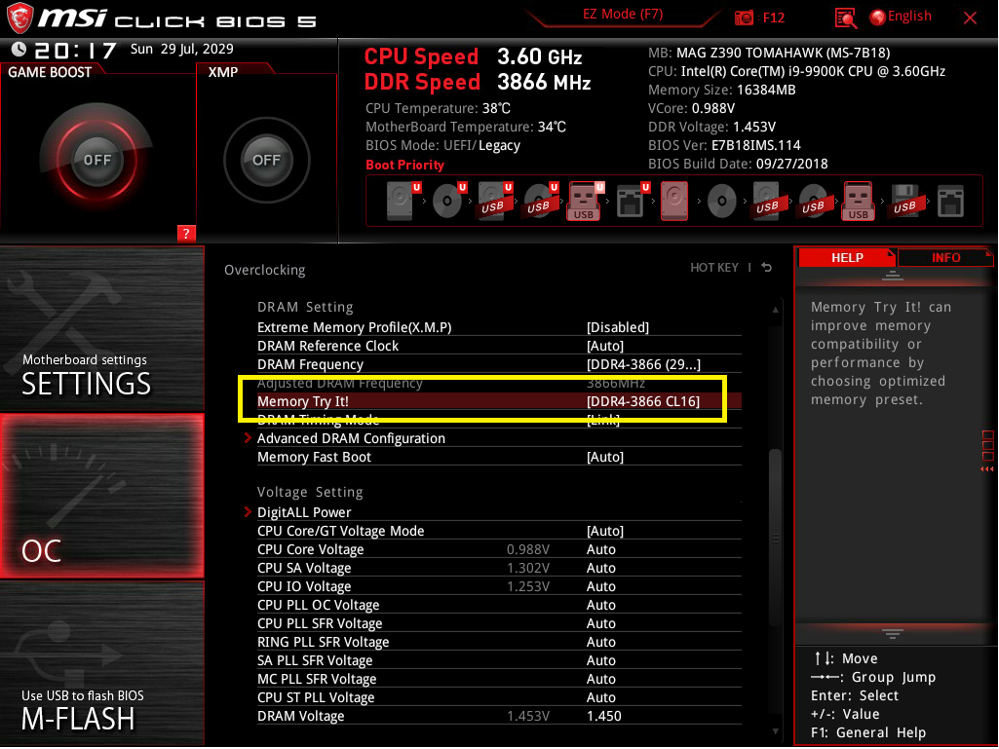
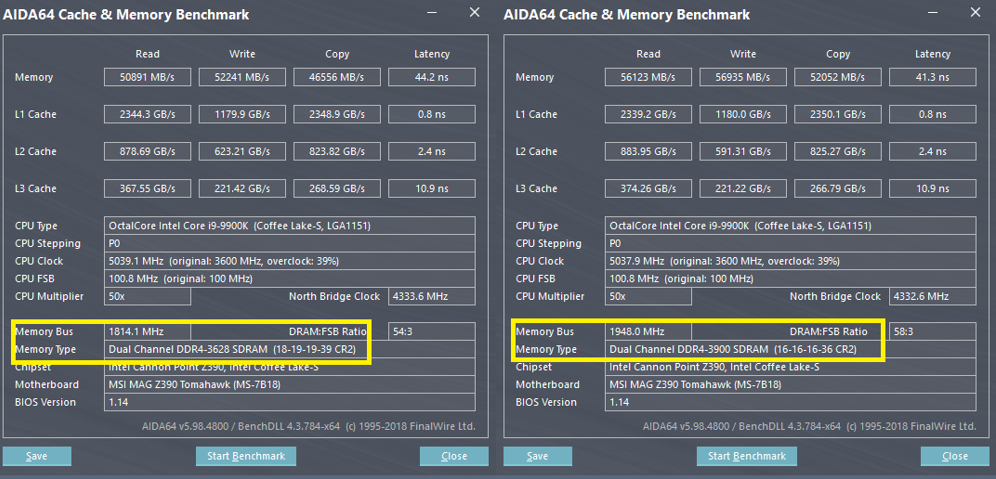
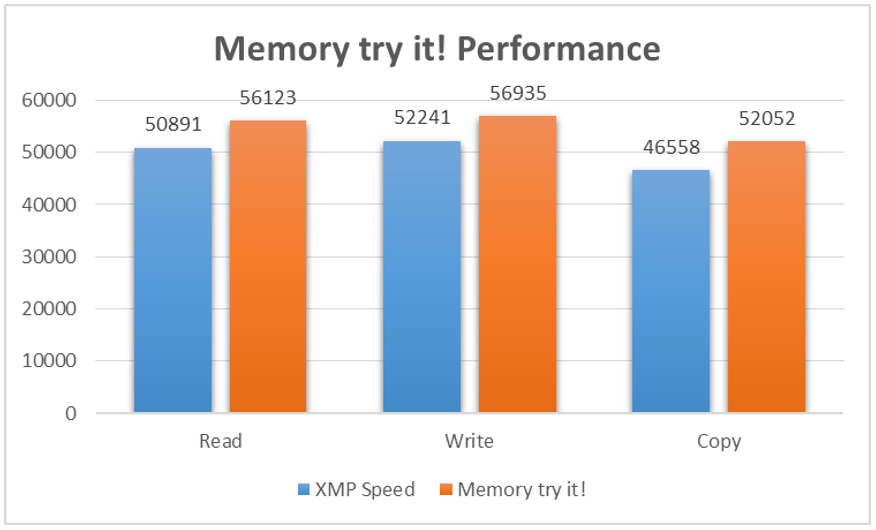
MSI Z390 全系列導入最新世代的 DDR4 Boost,全新的 PCB 線路訊號設計及 BIOS 的調教,除了支持 XMP 超頻外也導入支援更高頻率的 Memory try it !目的讓使用者更簡易建立超頻系統。
1.XMP ( Intel Extreme Profile ) Z390 全系列支援 XMP 4400MHz ~ 4800MHz

Intel Z 系列搭配 K 系列處理器能夠體驗完整超頻樂趣,因為 CPU 和 DRAM 皆可進行超頻,這次 Z390 系列主機板搭配發表的三款處理器分別為 9600K、9700K 和 9900K,MSI 亦同時推出九款 Z390 主機板。因此這篇文章將會簡單介紹 CPU 超頻,內容能適用於 MSI Z390 各主機板,讓不熟超頻玩家的使用者可動手體驗超頻樂趣,並獲得更佳的 CPU 效能。
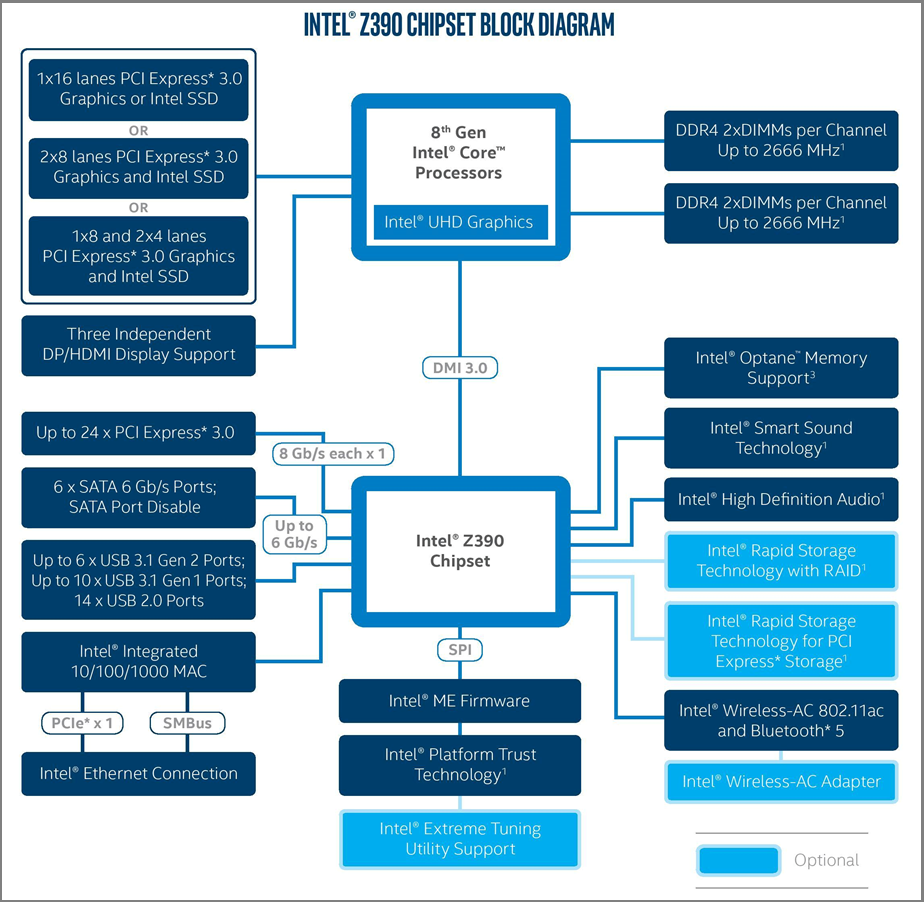
Intel Z390 Chipset Block Diagram
Z390 適用 8th 和 9th 世代處理器,與 Z370 Chipset 相比,Z390 Chipset 多了 Intel Wireless-AC 無線網路模組與原生 USB 3.1 Gen 2。
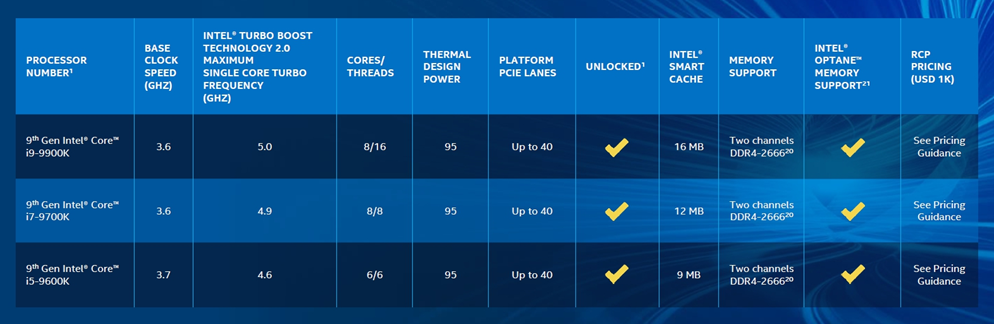
Intel 9th CPU spec
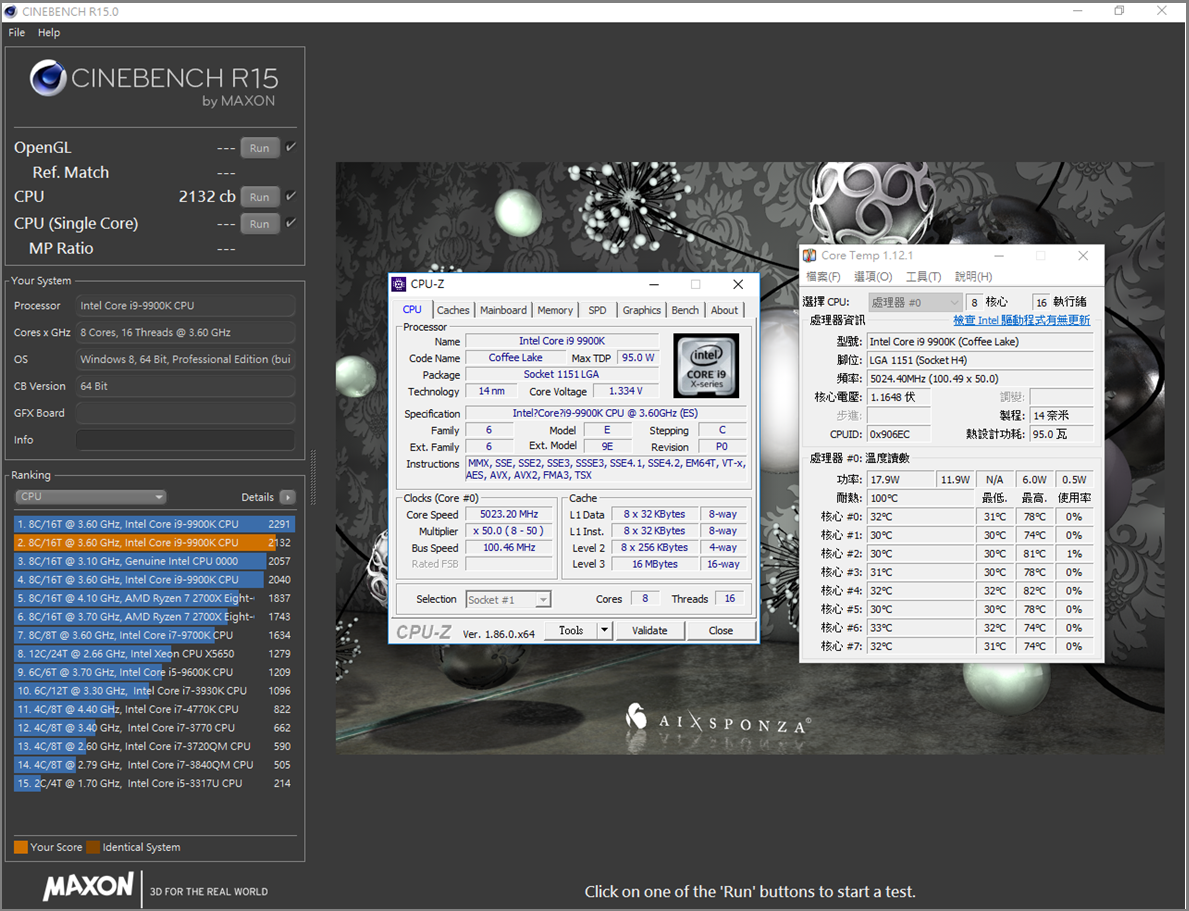
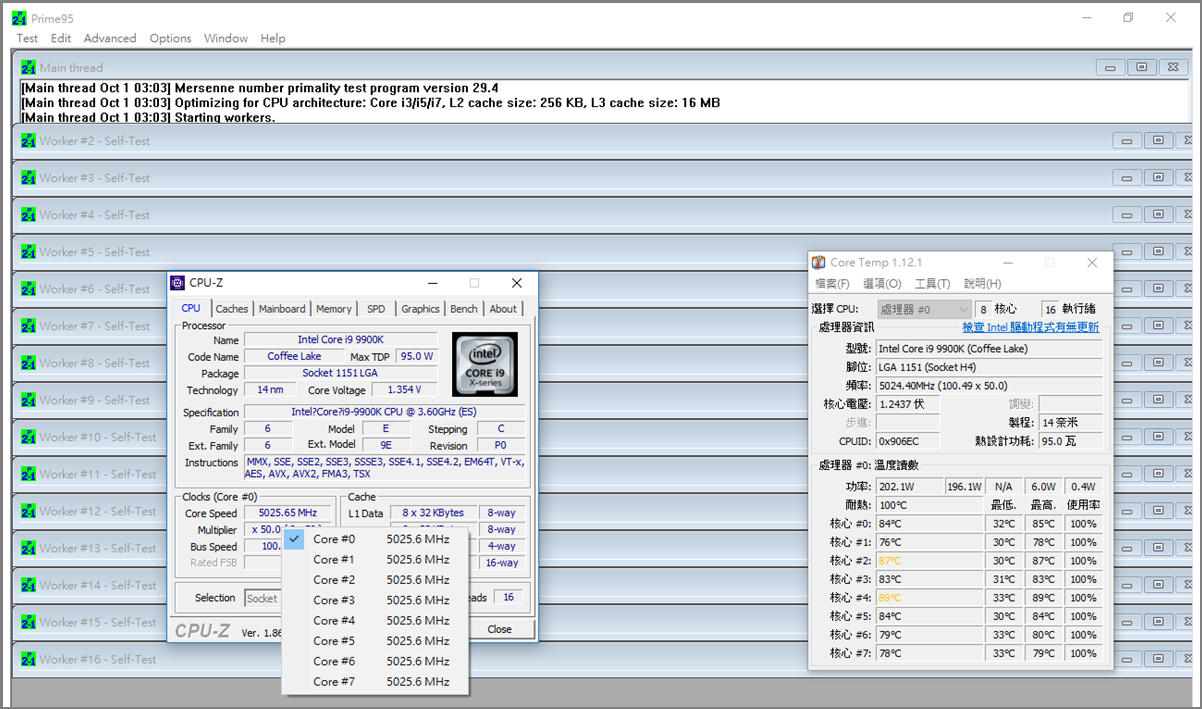
這次發表的 Intel 9th CPU 共有三款,分別為 i5-9600K、i7-9700K 和 i9-9900K,其中僅有 i9-9900K 具有 HT,另外兩款無 HT 設計,i5-9600K 為六核心,i7-9700K 和 i9-9900K 則為八核心,TDP 皆為 95W,皆有支援 Intel Turbo Boost 2.0,其中 i9-9900K turbo 後可達 5.0GHz。另外改用 STIM 材質作為晶片與外蓋 ( 鐵蓋 ) 導熱材質,導熱效果會比過去的散熱膏更好,亦可提升超頻能力。
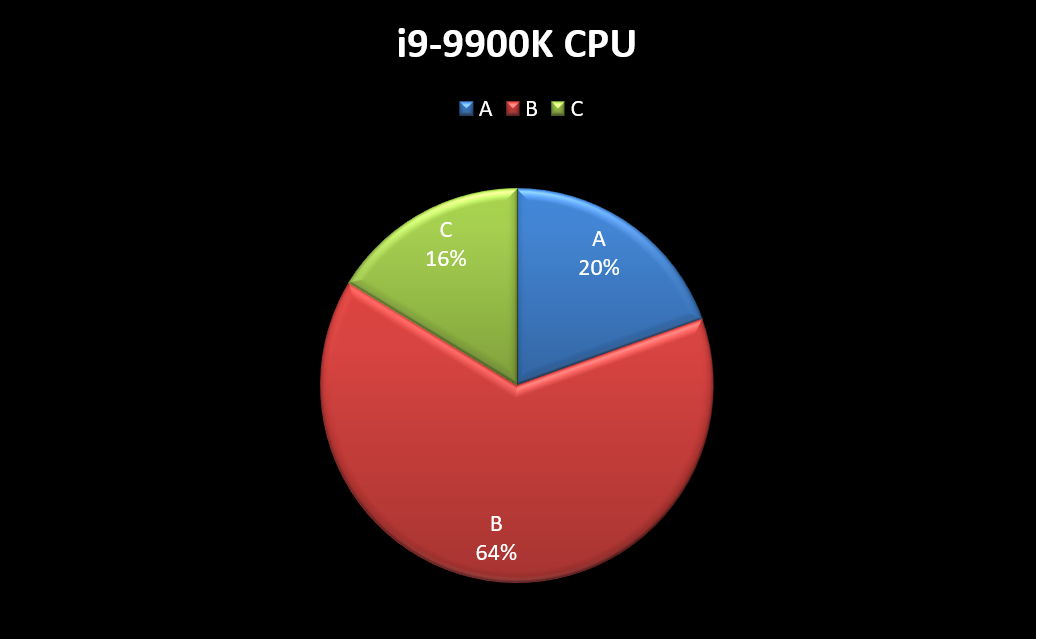
CPU 體質分析公開
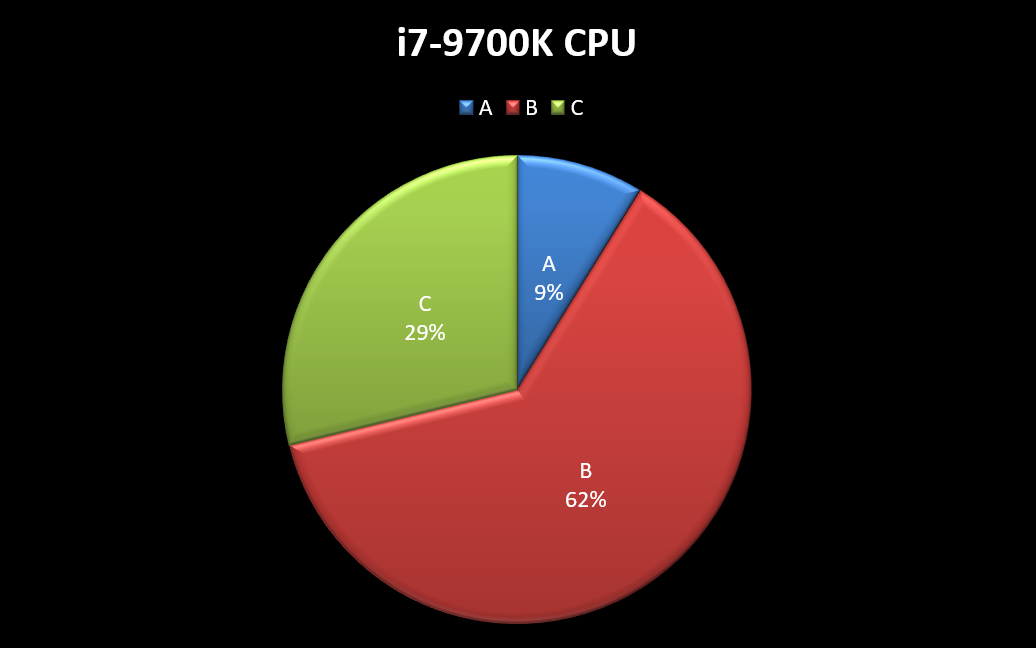
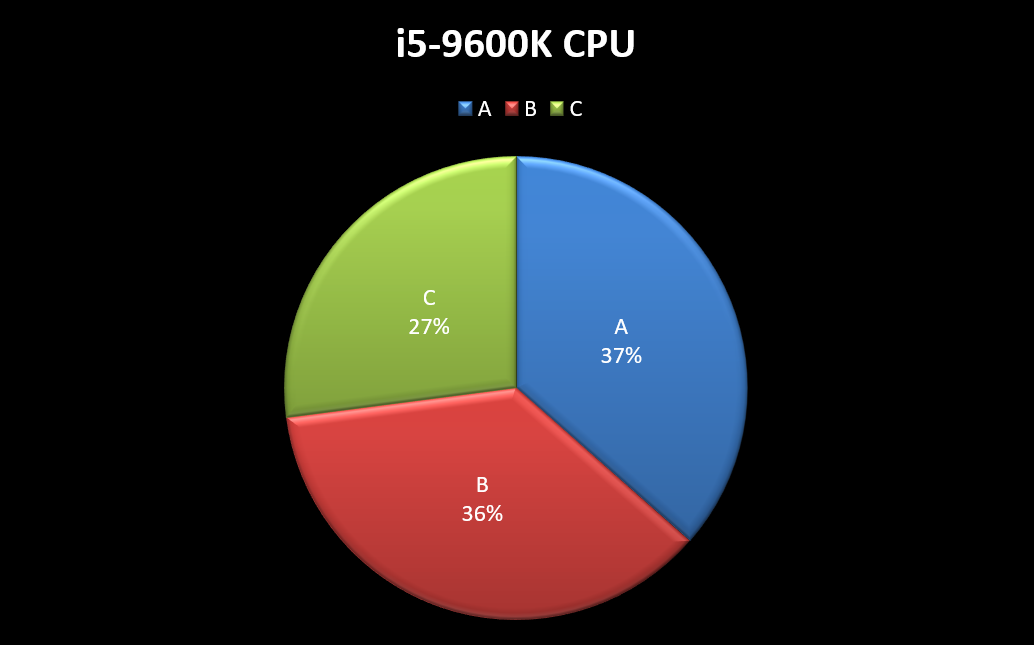
超頻並非想超多高就超多高,主機板供電與散熱設計、散熱器散熱能力與 CPU 處理器體質皆會影響到超頻結果,當然超頻設定方式亦要納入考量,因此超頻要納入考量的點是多面向的。下方我們將會公布我們 CPU 體質篩選結果,供玩家了解 i5-9600K、i7-9700K 和 i9-9900K 體質分占比率,當然該數據僅供參考,實際體質可能會因為週期不同而有差異。
P.S: CPU 體質我們大致分為 A、B、C 三個等級,A 屬於最佳、B 則居中、C 則較弱。
i9-9900K 體質分析圓餅圖
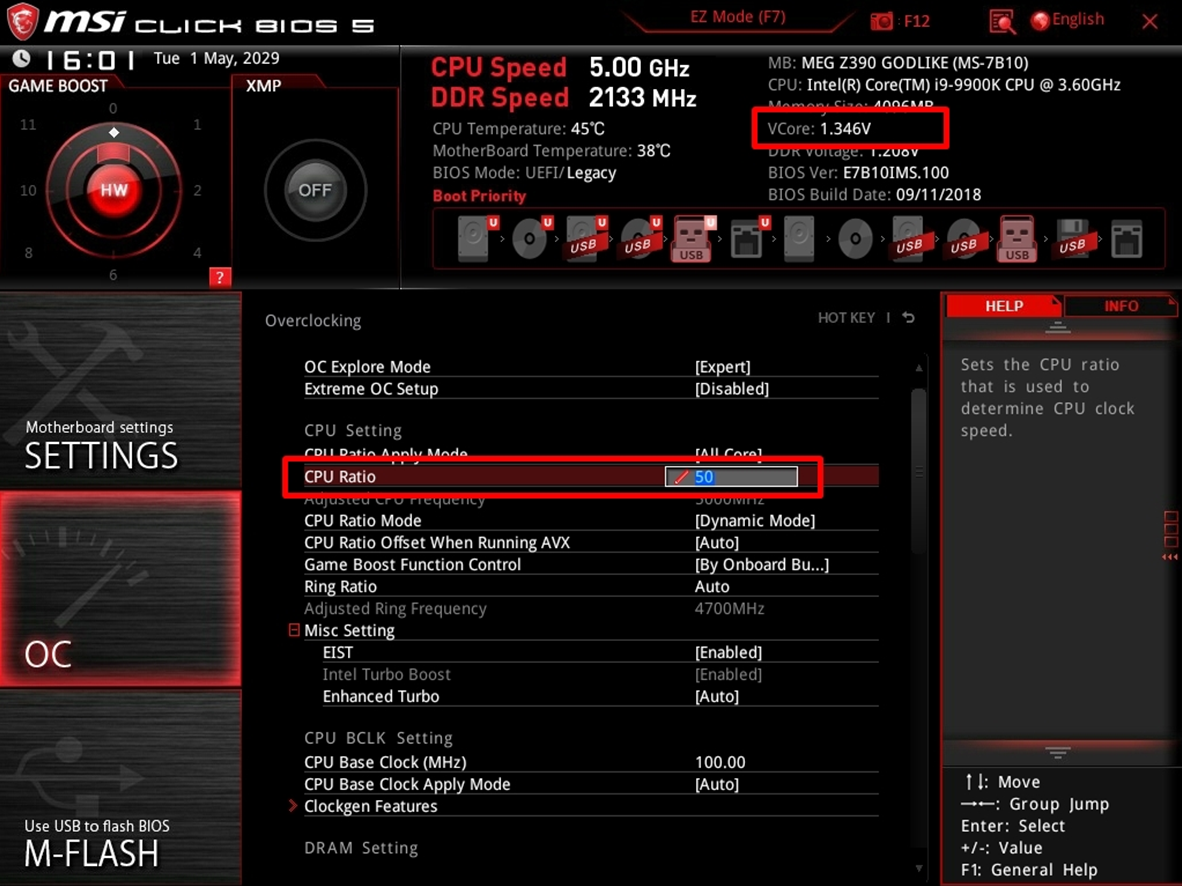
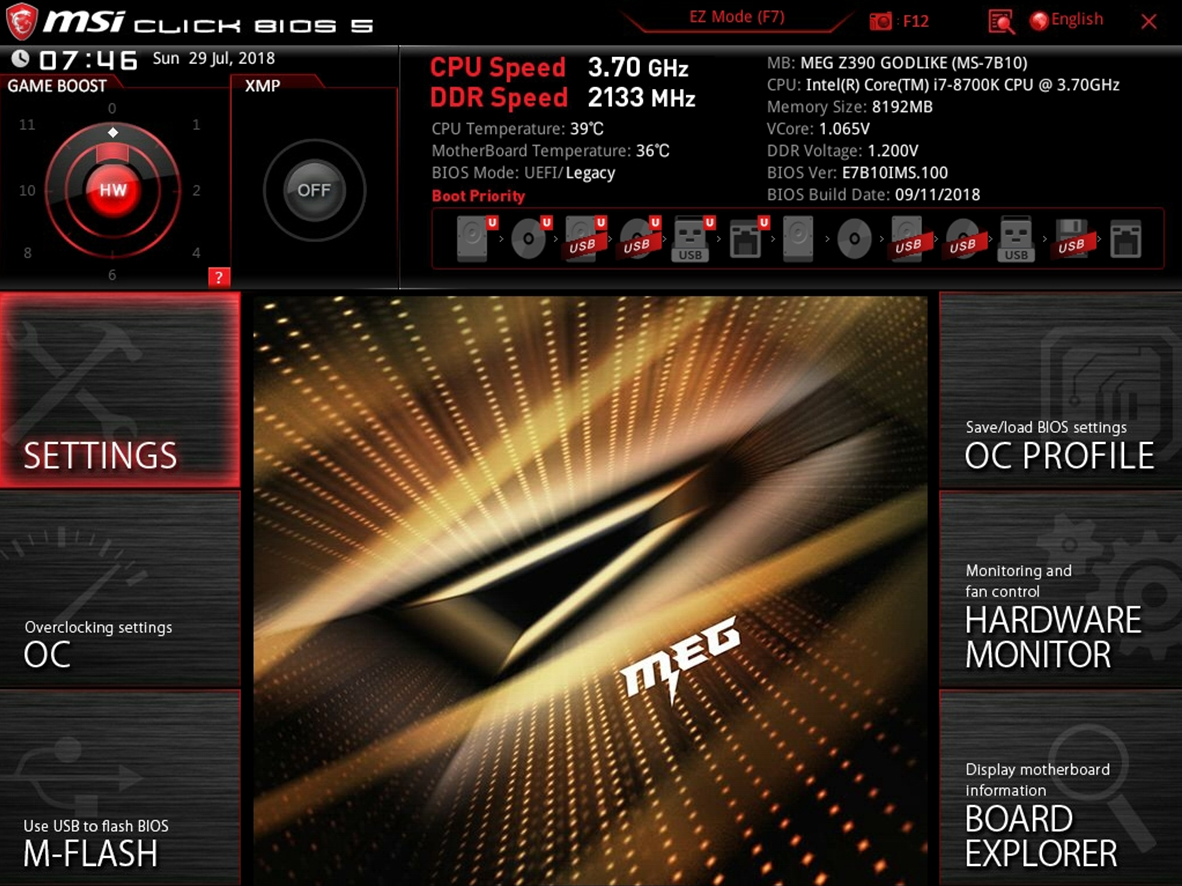
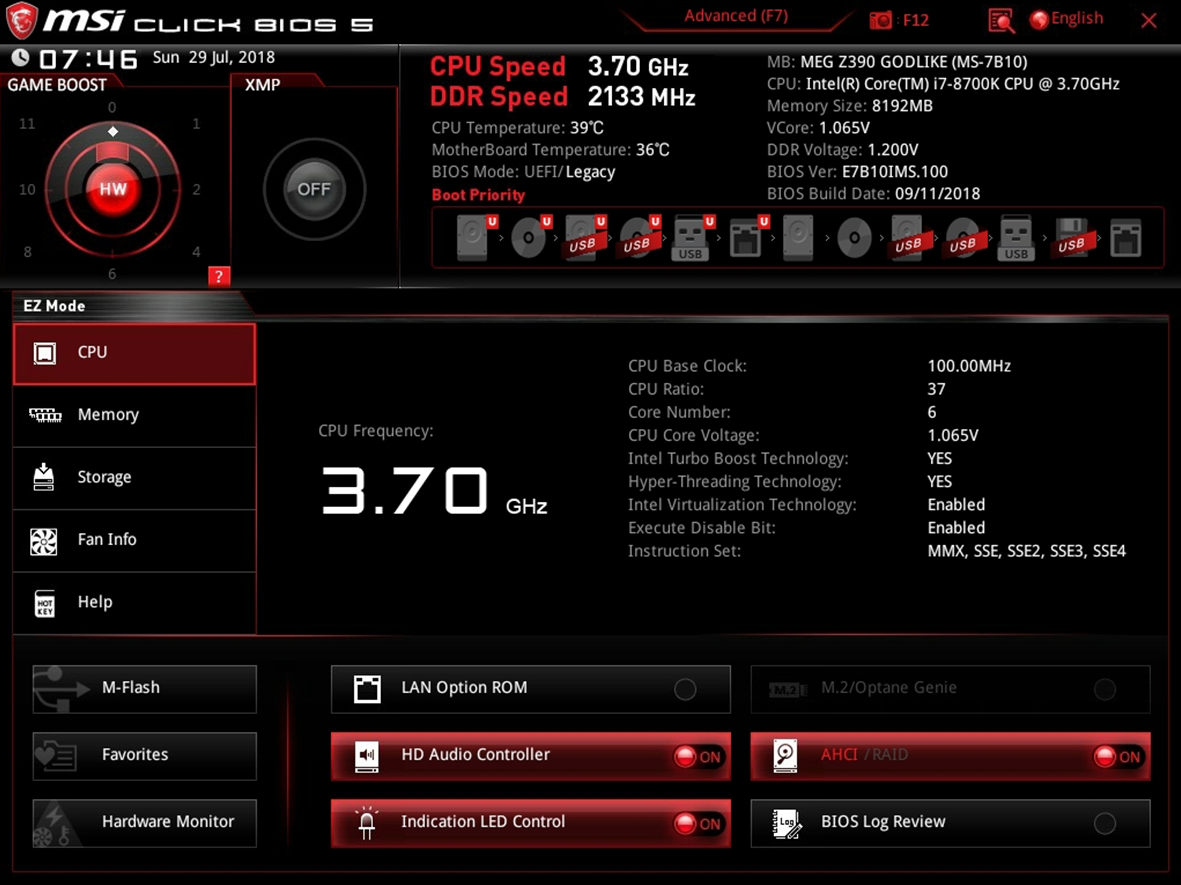
進階模式中可以看到左右各有三個分頁可選,Overclocking setting 超頻選項集中於 OC 頁面內,故進入該頁面
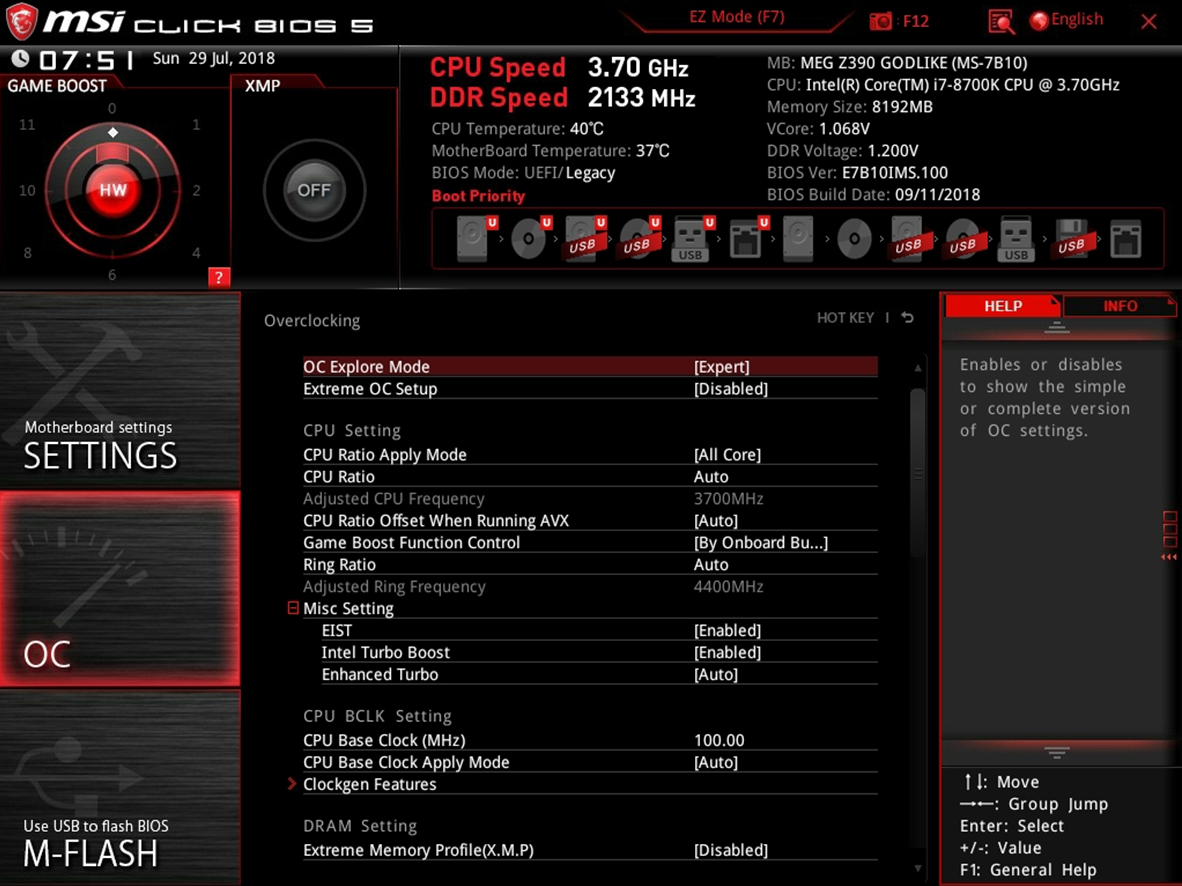
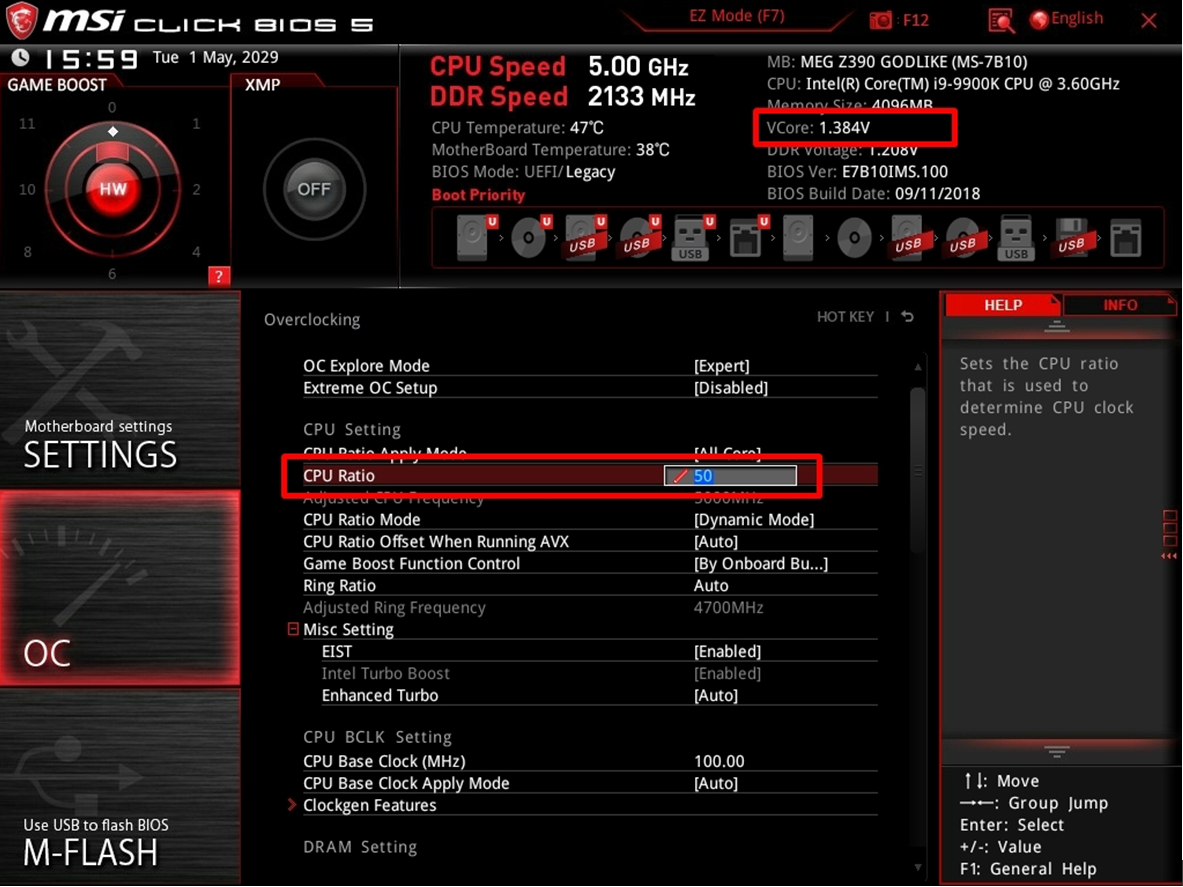
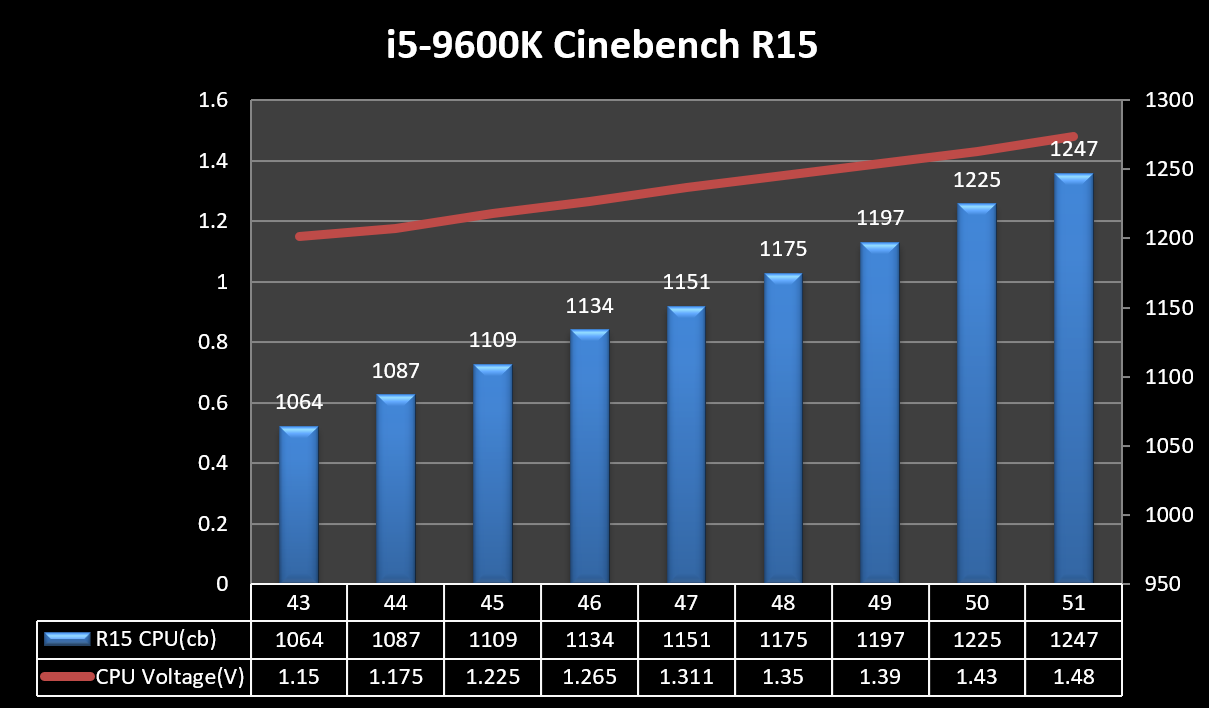
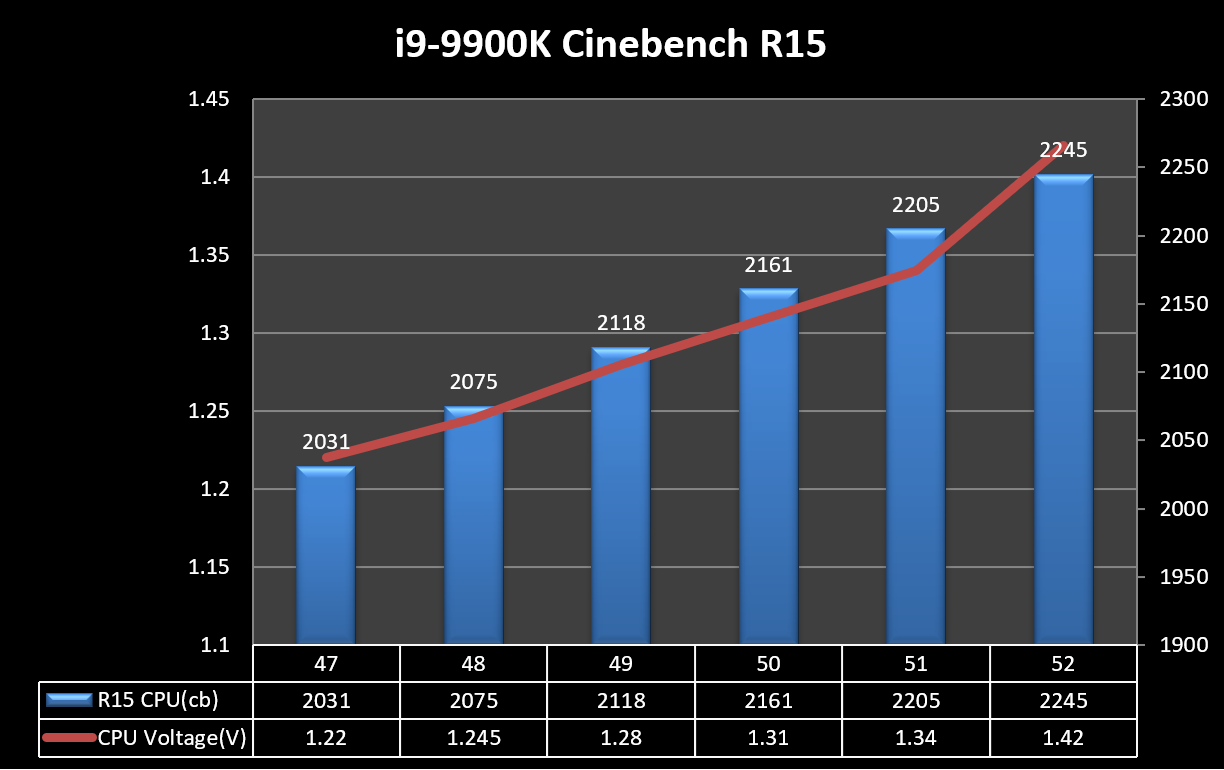
首先調整 CPU Ratio 和 Ring Ratio,前者調整的為 CPU 頻率,後者則是調整 CPU 緩存,內存控制器等非核心頻率。9900K Ring Ratio 建議設定 47、9700K Ring Ratio 建議設定 46、9600K Ring Ratio 建議設定 43,當然使用者可以嘗試其他設定。
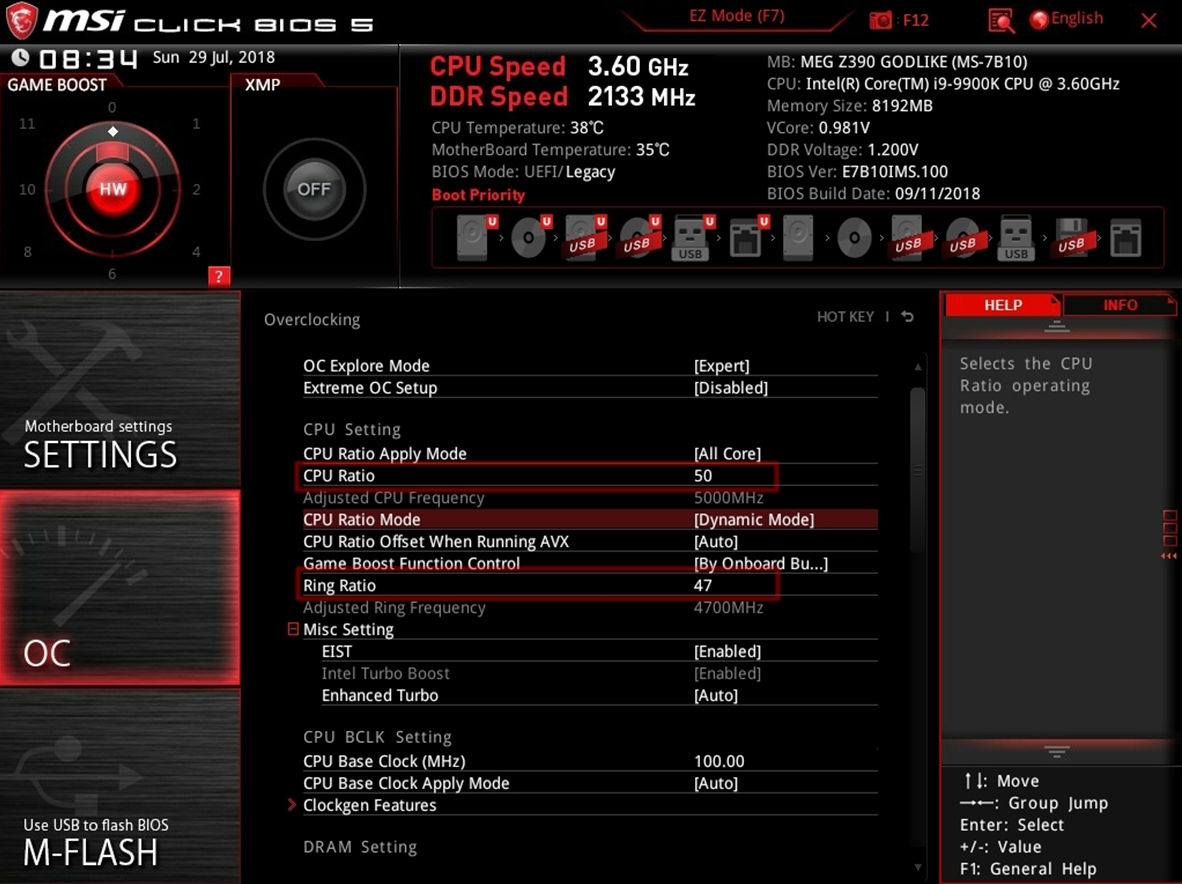
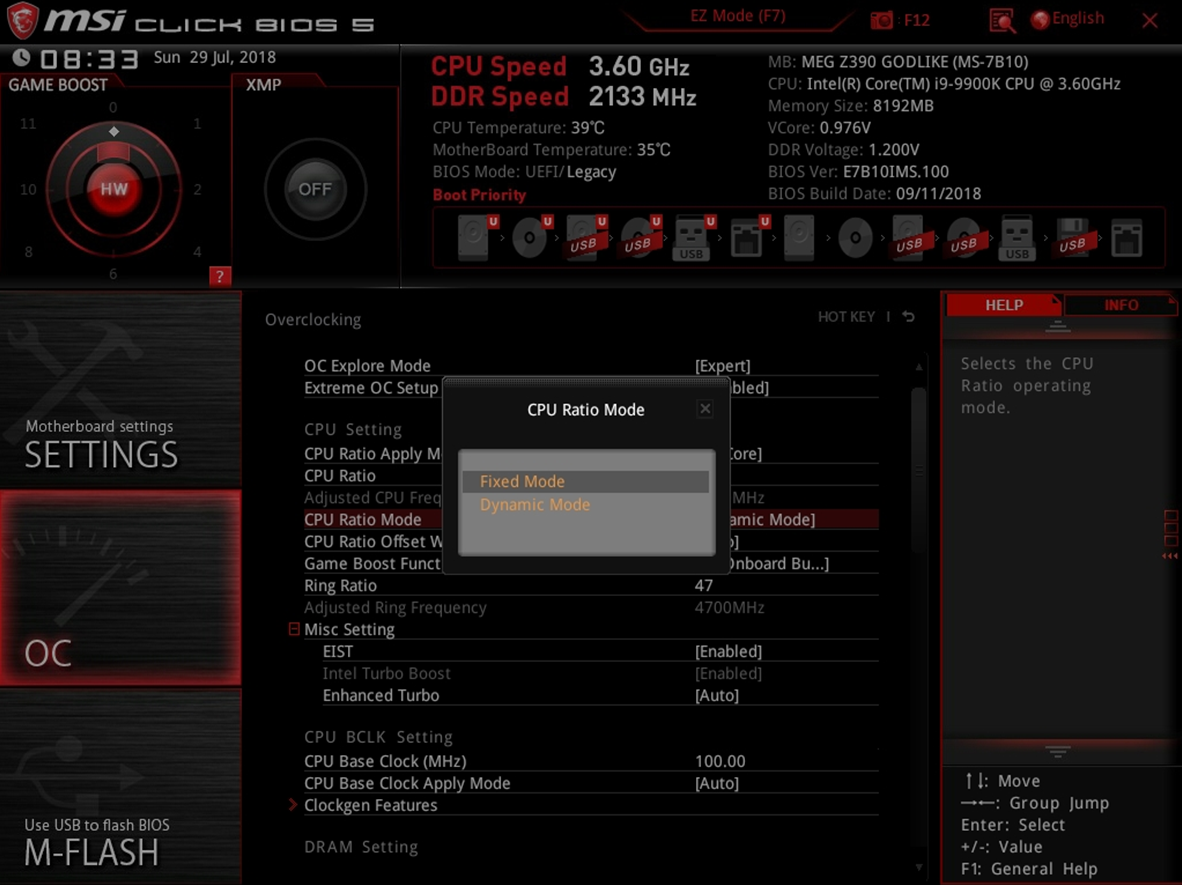
CPU Ratio mode 分為 Fixed mode 和 Dynamic mode,若是設定 Fixed mode,CPU 頻率永久鎖定設定的頻率,Dynamic mode 進入待機將會將頻率下修,最低為 0.8GHz,玩家可以依據喜好改變。筆者偏好設定 Fixed mode。
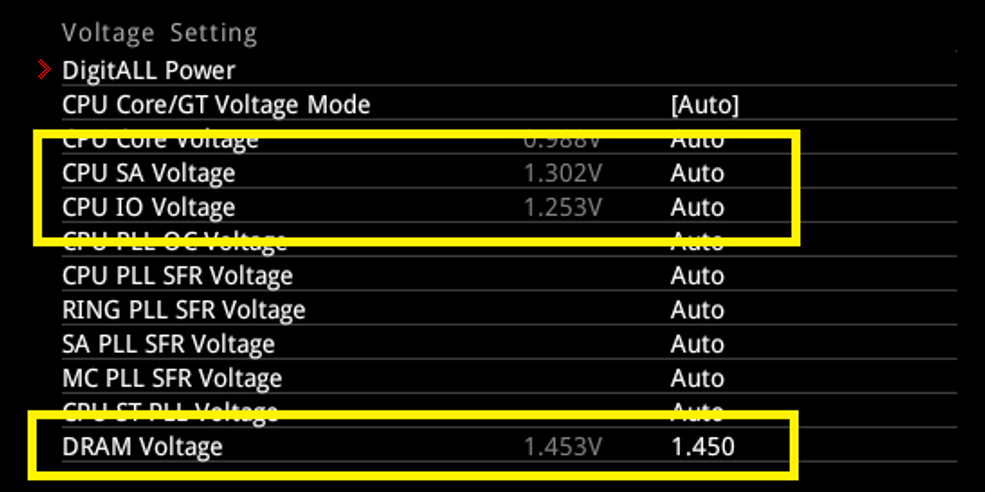
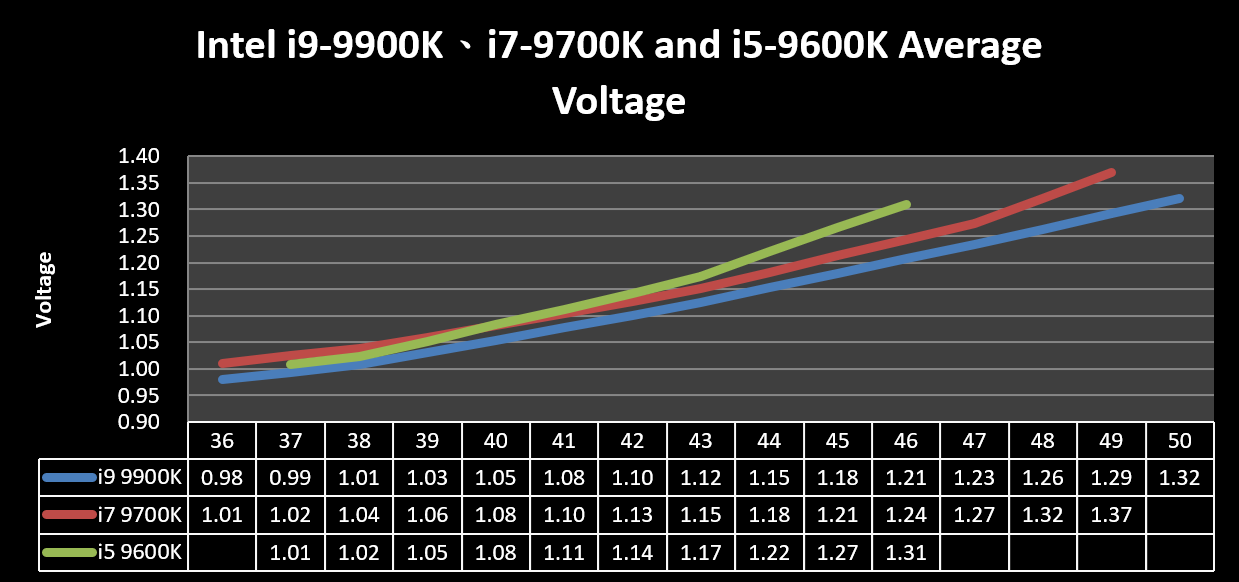
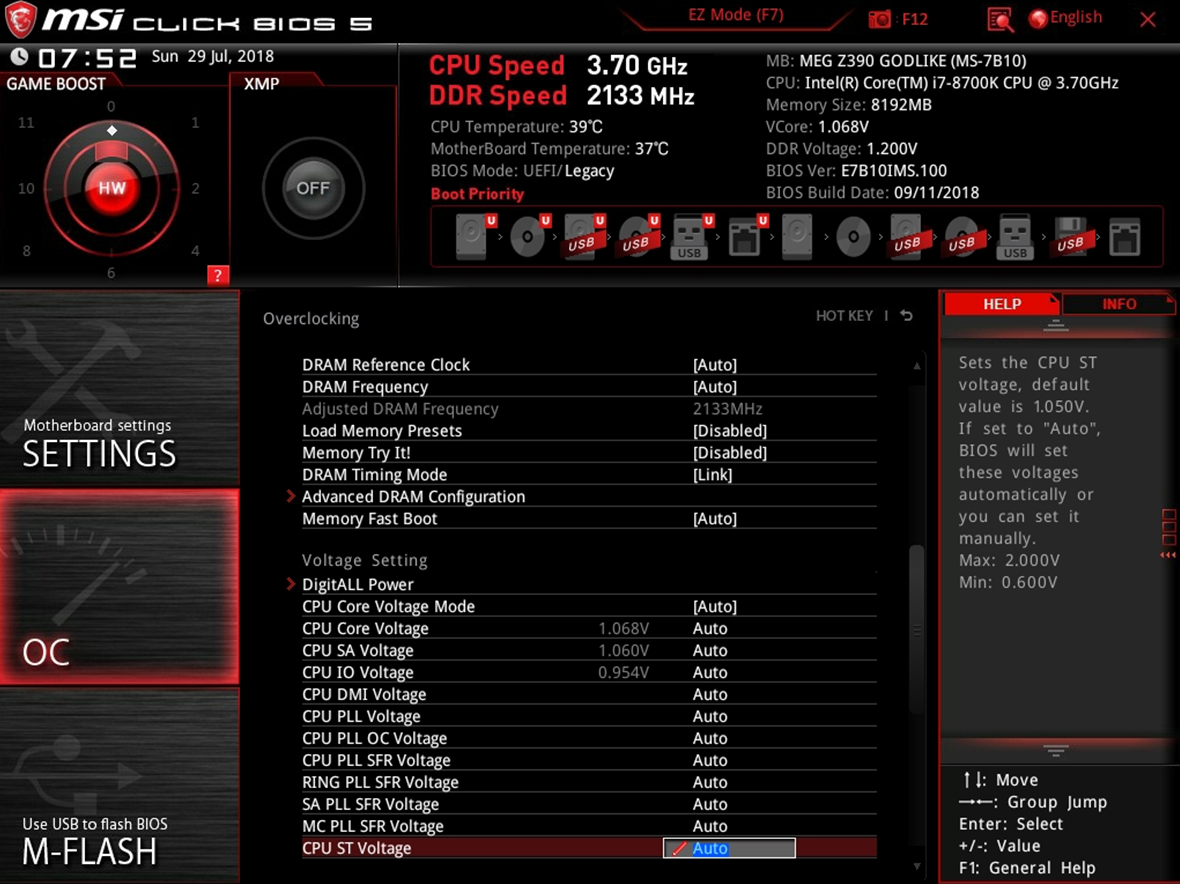
再來調整 CPU Core Voltage 電壓,9900K 5G 建議 1.32V,9700K 5G 建議 1.37V,9600K 5G 建議 1.43V。
P.S:不同的 CPU 所需電壓不同
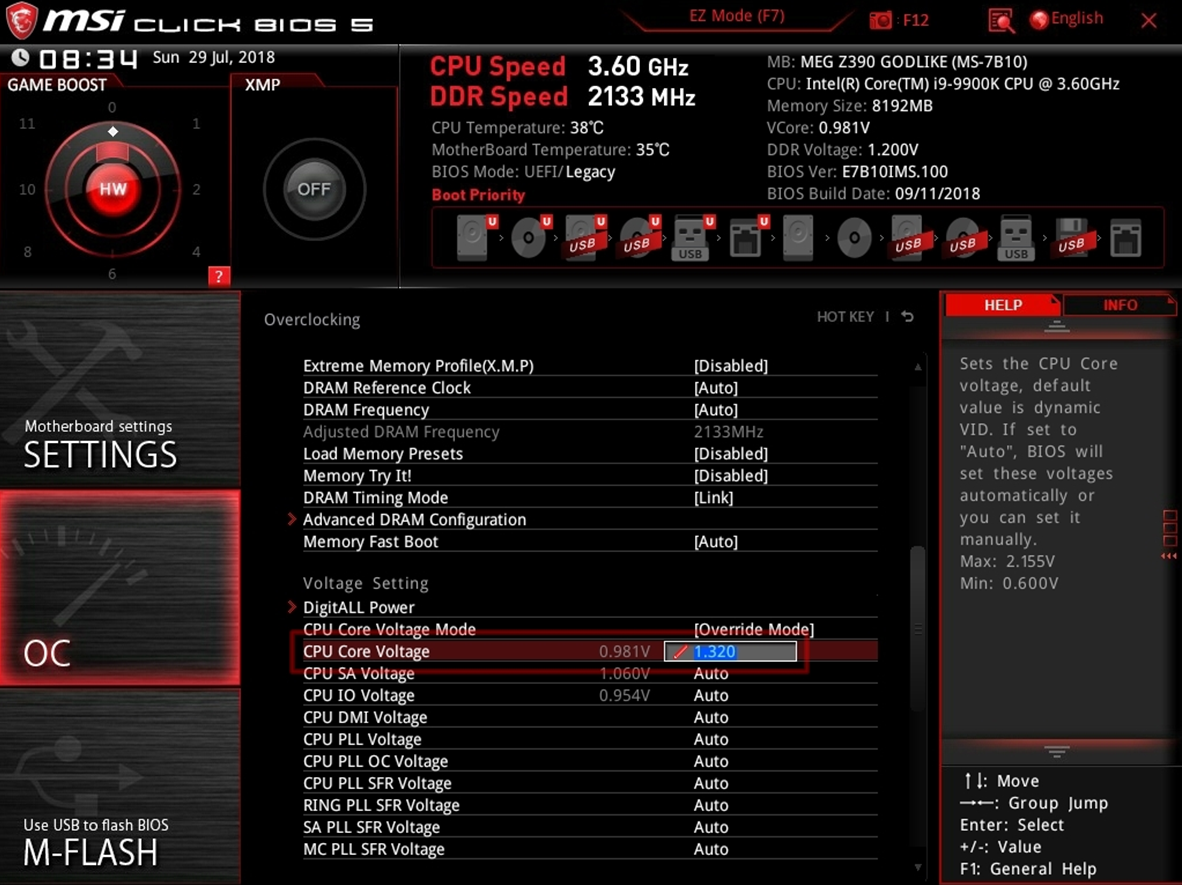
CPU Core Voltage mode 共有五種,筆者超頻多使用 Override Mode,不論待機或是負載電壓多會維持設定值,Adaptive Mode 則會升降電壓,因此待機與負載時電壓會改變。後方三個則是加入 Offset Mode,Offset Mode 是透過預設電壓再去增減電壓,玩家可以設定增或減的 Offset電壓值,相對的 Override+ Offset Mode和Adaptive+ Offset Mode 則是設定一個 CPU 電壓值和一個增或減 CPU Offset 電壓值。

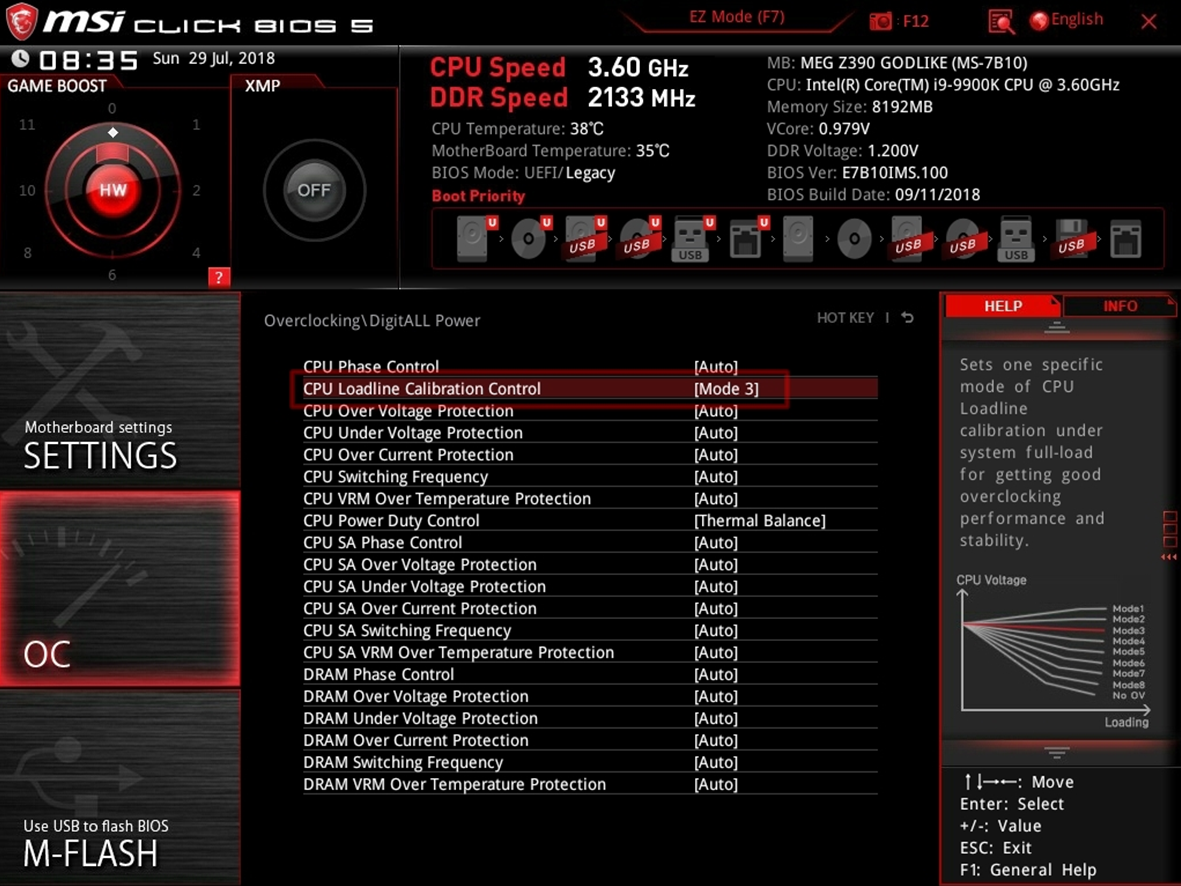
CPU Loadline Calibration Control
在 CPU 負載增加時造成 CPU 微量掉壓。由於系統無法維持設定的核心電壓 ( vCore ),連帶導致超頻設定也不穩定。CPU 電壓會下降至低於系統負載,此時很容易造成藍色當機畫面 ( BSOD ) 或當機問題。透過 CPU Loadline Calibration Control 可以改善此問題,超頻時建議設定 mode 3。
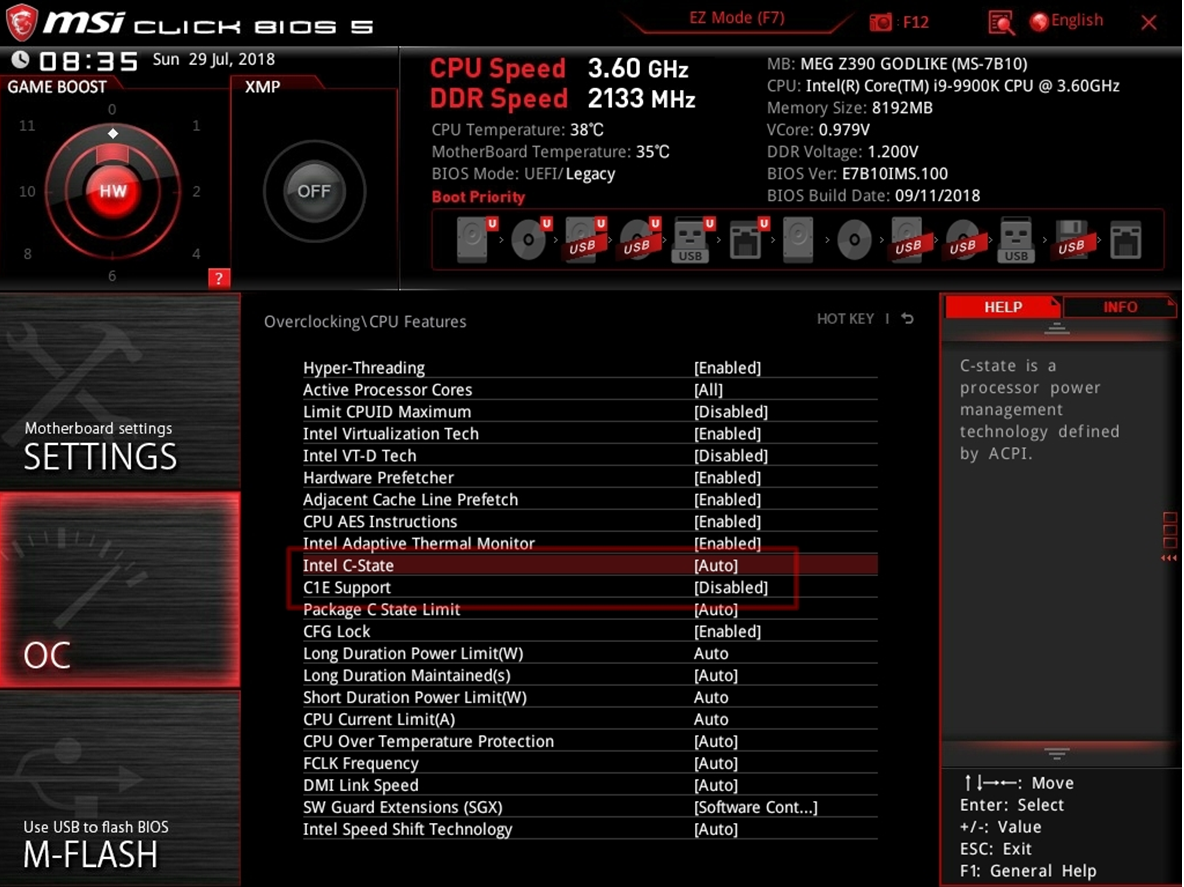
超頻時省電模式可能會影響穩定性,因此建議會建議關閉 Intel C-State 和 C1E Support。當然玩家亦可嘗試開啟省電選項。
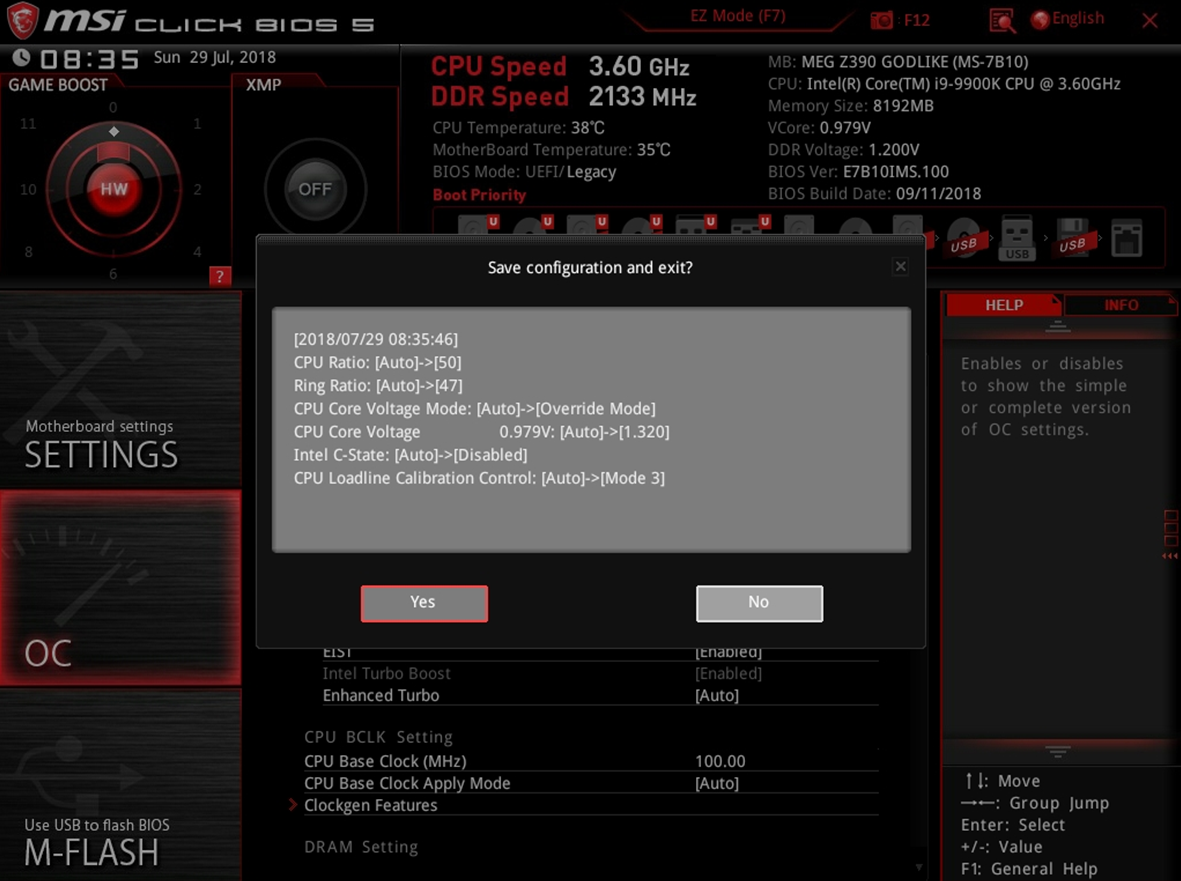
F10 存檔和離開
當你設定好就可按下 F10 存檔離開,離開前會詢問你 YES or NO,同時可以看到你剛剛調整過那些選項,玩家們可以在此做二次確認。